October is a month full of spooky and creepy topics. One of my
favorite lessons ever is when I teach my kiddos about the burial steps the ancient Egyptians took for burying their dead. Yea, part of it is I crack up {inwardly} watching their reactions to "they removed the brain with a metal hook through the nose". They all scream and act as thought they don't want to hear more. But. They. Do. If we didn't have time to learn any more facts, my kids were begging for something new as they walked out the door for dismissal.
I usually try to pair this activity with the Magic Tree House:
Mummies in the Morning. This year it just didn't work out but this activity still ran perfectly. We read one of my favorite books on ancient Egypt. It gives the students step-by-step instructions on what happened during the mummification process.
I am working on updating my "
How To" Make a Mummy product but this post will give you pictures and step by step instructions on exactly how
easy and
fun this experiment is!!
Seriously, this is such a fun experiment and really is not difficult at all. I promise!! Alrighty, here are pictures with step by step instructions...
 |
| First I cover my table with butcher paper. All of my ingredients are set up ahead of time. The students love walking in and seeing everything read for our experiment. |
 |
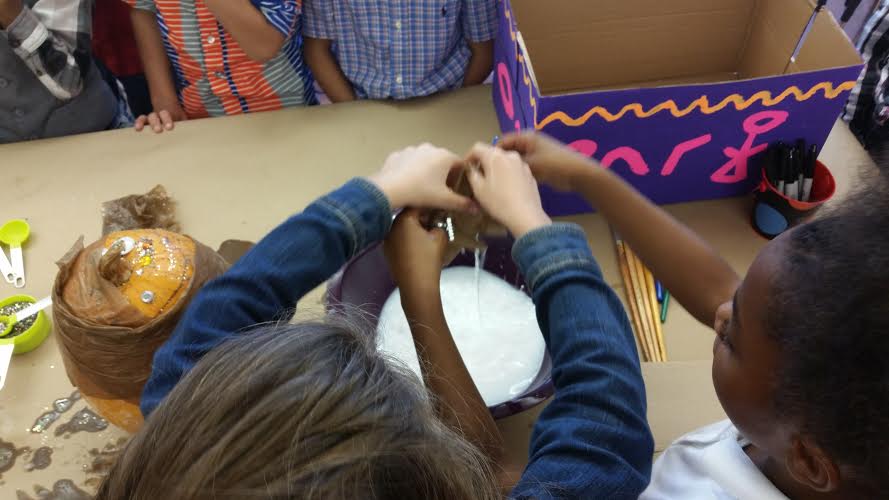
| I have my students pretend they are entering an operating room. They all must have hand sanitizer before they can enter the "sterile" environment. The purple bowl is from Dollar Tree and is our water/glue mixture for our wax. The sarcophagus is a box that was painted with tempera paints using Egyptian hieroglyphs. |
 |
| I used liquid measuring cups for our water, salt, and oil. I have used a cafeteria tray in the past for our "mummy" to sit on while it was being "washed". This year I used bowls and those seemed to work even better. My blue and pink containers came from Target Dollar Spot and Dollar Tree. I took tags and taped them on as labels for our organs. For spices, I used multi-colored glitter to give our mummy some bling. My husband planted pumpkins in my garden so I cannot say the precise size. A medium sized pumpkin would work best. |
 |
| My measuring spoons and utensils came from Wal-Mart and Gabriel Brothers. I cheated and swiped a Ziploc baggie of sand from my boy's sandbox. You can get a big bag of play sand from Home Depot for under $4. It will last you for years depending on how many projects you use it for. |
 |
| This was one of my favorite shots from the entire day. We were beginning to remove organs from our hallowed out pumpkin. We remove one at a time, place them inside the containers, and remove them from the operating table. |
 |
| After soaking in the salt, we rinse with water from the Nile, oil, sand (I use cheapest vegetable oil I can find at Wal-Mart.) and the finally spices. |
 |
| This really is a student run project. I help out very little and make this extremely hands on. Right here we were washing the sides with water to make sure it was all covered. |
 |
| We did the same for the oil. Fortunately, I have a sink in my classroom. In years past, I bring in a bucket and fill it with water. I set a roll of paper towels next to the bucket for the students to rinse off their hands. |
 |
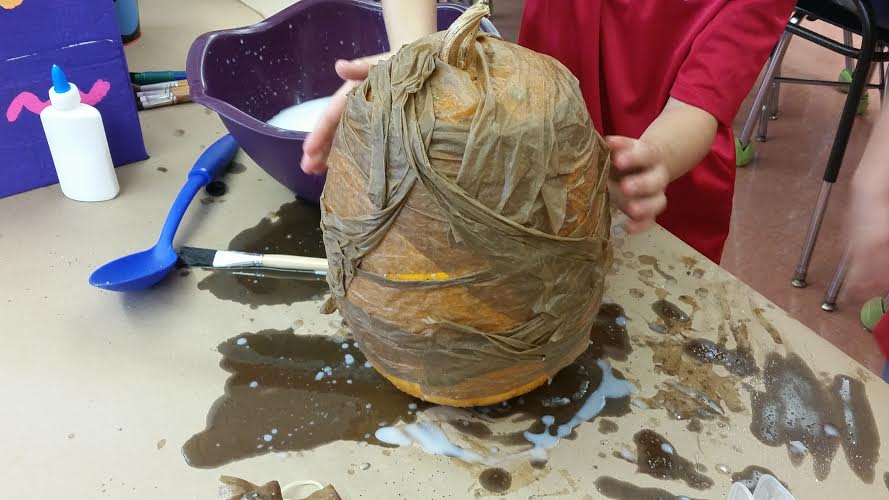
| After scrubbing our mummy with water, oil, and a little sand we filled the cavity with about 2-3 spoonful's of sand. |
 |
We glued on googley eyes and added a few sparkling gems for our "head".
|
 |
| Soaking the linens in wax. |
 |
| Our finished mummy finally laid to rest in the sarcophagus. |
 |
| It's difficult to get the strips to lay flat but I really tried not to help and let the kids do it on their own. They were so proud of their hard work. |
As soon as my product is completely updated, I will come back and share:)


No comments:
Post a Comment